


Replacement Vane Set for AQ5, AQ7, AQ73 Sweetwater Rotary Vane Compressors
We recommends carbon vane replacement at nine-month intervals to ensure trouble-free operation of your compressor.
Replacement Vane Set for AQ5, AQ7, AQ73 Sweetwater Rotary Vane Compressors
Vane Replacement
We recommends carbon vane replacement at nine-month intervals to ensure trouble-free operation of your compressor.
The following tools are required: 3/8” or 7/16” socket/wrench, small hammer and antiseize compound.
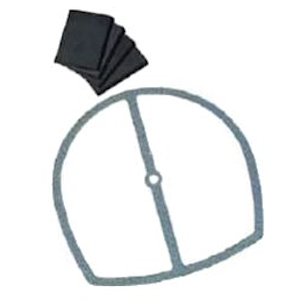
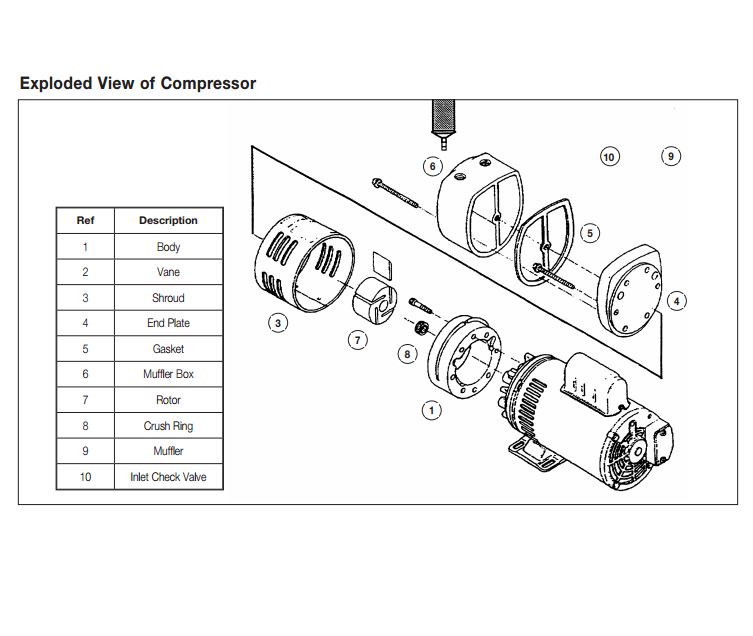
- Remove the two end caps from the front of the muffler box (if applicable) and the five muffler box bolts, being careful not to damage the gasket. If the gasket is torn, scrape it off with a sharp knife and replace.
- Tap the box with a small hammer to loosen it. Do not pry with a screwdriver.
- Remove the six bolts holding the end plate to the body. Remove the end plate. Do not remove the rotor or loosen any of the electric motor through bolts.
- Check that vanes are moving freely in and out of vane slots. Replace any vane if more than 50% extends past the vane slot. Top clearance (between rotor and body) may be adjusted by loosening body bolts and lightly tapping on the compressor body while turning the rotor. About .004 inch—this paper’s thickness—works well.
- Remove vanes and clean both sides with fine emery cloth. Clean the end plate with fine emery cloth.
- Flush vanes, body, rotor and end plate with solvent (part no. AQ255), and remove all solvent from each part.
- Check the body, rotor and end plate for scoring. If each part is clean and shows no signs of scoring, reinstall parts. If scoring is present, replace with new part(s) or contact Pentair AES for service.
- Insert new vanes as shown below.
Reassemble by reversing the previous directions. We always recommend using an antiseize lubricant on each bolt to ensure its easy removal for the next vane replacement. Bolts should be reinstalled and tightened in a similar manner to replacing the lug nuts on a vehicle wheel. Start with one bolt and move to the right, skipping one and tightening the next. When reinstalling the muffler box (if applicable), be certain to install the center bolt first to ensure proper gasket alignment. Before replacing the muffler box, plug your compressor in for a quick sound check of the valve rotation. If an unusual sound or stopping of the rotor takes place, disconnect and recheck the vane replacement.
Item No. AE-SW-AQ5V


